


This will replace your broken or worn out Dometic RV furnace. This doesn't include a backing plate or access door needed for a new installation. With 30,000 Btu of heat, we recommend this for RVs about 30' long.
Features:
Specs:
Bigger isn't always better. Getting a furnace that's bigger than you need can cause problems. A major one is that it will burn even more propane than you need.
You really only need about 1,000 Btus for every foot of RV length. For example, a 20,000 Btu furnace would be good for a 20' trailer or motorhome. That's why we'd recommend this one for a 30' trailer.

California residents: click here
Videos are provided as a guide only. Refer to manufacturer installation instructions and specs for complete information.
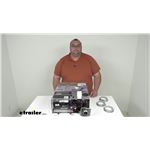
Hello neighbors and friends, Steven here with etrailer.com. Let's take a quick look at our Dometic RV furnace running on LP gas with an automatic pilot. 12 volts of power DC current runs it and it's rated at 30,000 BTUs. Now, you would need an access panel or access door, possibly with purchase on this particular unit, but not necessarily so, meaning you can have just this guy sticking out the side of your camper RV if you wanted it to. And that being said, quickly, I wanna go over some dimensions first and upfront to make sure this is gonna be a fit for you. As far as a overall length, or you can call it a depth if you want, it's 20 inches.
A height is seven inches tall and the width up here in the front is 16 1/2 inches wide. The whole unit weighs about 33 1/2 pounds. It has a duct static pressure of 0.10 inches WC and a return area of 80 square inches. Now folks, this furnace can and will quickly and efficiently heat the interior of your RV or camper. It can either replace, upgrade, or just simply add a furnace.
It is propane powered, so it's perfect for boondocking. You can use it without electrical hookups. It features an automatic DSI gas pilot, which is gonna reduce the risk of gas leaks and also increase the fuel efficiency. Now it will relight automatically until the heater is switched off. And it has a low air turbulence, which provides quiet operations.
That's compact, as you can see. So it should work lots of different areas. It can be configured either horizontally or vertically, depending on your preference for flexible installation. And on the front here, there's a small panel. It's kind of hard to see.
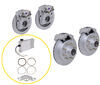
There's an on/off switch right here behind my fingers there. And there's also an LED light right in the middle of that. And that just can flash diagnostic codes if faults are present. Now, like I mentioned, access doors or panels, if you so choose, are sold separately. I'll throw those item numbers on the screen for this particular unit. You have black or white options and also a thermostat. Thermostat will be required for installation, that is sold separately. The panel doors, again, that's optional because again, you have just this main guy here. If you are putting it on maybe the outside and you are okay with just having this, you could do that. If you're going inside the camper, RV or whatnot, you probably want an access door panel, something of that nature. You're also gonna need some RTV sealing or butyl tape, which is sold separately and you're gonna need some number six or number eight by half inch panhead type 80 screws or self-tapping screws, again, not provided. So all those screws basically are is if you get a panel, the panel's gonna potentially have four screws to help bolt that in place. You would need four self tappers for this guy if you are using this one because again, it's going on the outside of the RV most likely in that case. They give you two mounting brackets and two little screws as far as mounting it. And those attach, I believe, up here in the front. And again, the panel would also go up on the front part if you purchased one separately. Now, I always recommend to people, read through the instructions when you get this first, if you're gonna do this yourself, make sure you're fully understanding and comprehending. As far as the knockouts, you got two top, two side, and three in the back, and two on the other side. And these duct adapters come with it, three of 'em, and that's where those would potentially go. But again, read instructions, make sure you know what you're doing first. If you're not comfortable, locate maybe a dealer from our website that's associated with us potentially in your area and we can help you with that possibly is finding a dealer locator and whatnot. Well folks, again, motor home use, travel trailers, fifth wheels, we got you covered with the Dometic RV furnace. Again, 30,000 BTUs of heat. It's gonna be a great addition to your RV or camper or again, a replacement if you need it. I'm Steven. Thanks so much for your time. I hope this information's been helpful for you. Stay safe out there and have a great day.

It was easy to get all the info I needed to select the correct heater for my 5th wheel.
etrailer was extremely helpful in navigating the myriad of choices available and determining the correct unit to purchase. We provided the BTU output and dimensions with the ductwork configuration that allowed the salesman to accurately sell the unit that (1) fit in the space provided without modifications (2) matched the BTU output (3) provided auto ignition and worked from the existing thermostat and (4) required minimum modifications for the ductwork.
The old furnace suffered from a cracked heat exchanger which set off the carbon monoxide alarm inside the camper. Carbon monoxide is deadly and could cause a fatality. We took the furnace apart and sent the heat exchanger to a welding shop for repair. The crack was repaired, but other holes were found during pressure testing. The heat exchanger was a
discontinued item for manufacturing and therefore lead to the decision to replace.
The unit cabinet required modification to accommodate a horizontal installation with a floor duct inlet that was different than the configuration provided by the factory. A new duct outlet was cut using a template from the old furnace and using sheet metal shears. The gas line required a slight modification to reroute from a side entrance to the top. The plastic connector and wiring harness were removed from the old furnace and installed on the new furnace with heat shrink connectors. The modifications took a couple of hours to complete, however the unit is installed and working as expected.
The furnace after installation is performing very well. The unit operates from the original thermostat. We have stayed in the camper for a week with temperatures dipping down to 25 degrees Fahrenheit with extremely good comfort. etrailer is highly recommended for anyone shopping for a new RV furnace.
Installed and working hours after delivery! Worked great in 1999 Dutchman .
Info for this part was:
At etrailer we provide the best information available about the products we sell. We take the quality of our information seriously so that you can get the right part the first time. Let us know if anything is missing or if you have any questions.


Thank you! Your comment has been submitted successfully. You should be able to view your question/comment here within a few days.
Error submitting comment. Please try again momentarily.